This campaign is part of the larger 1813 Campaign. It covers the period 1 to 16 May 1813 and the fighting in northern Germany between Second French Army and the Prussians. It has been done as a separate blog in order to keep all of the relevant blogs together and to avoid making the main campaign blog too long and complicated.
If you want to read about the main campaign it can be found at http://1813campaign.blogspot.com.
Summary of the Campaign
The French were tasked to hold the line of the river Elbe from Hamburg to Magdeburg. Only half of their forces were in position at the beginning of the campaign.
The Prussians advanced from Berlin and crossed the river. They then fought two minor battles (one corps per side) at Calbe and Colbitz. The French counter attacked and fought a medium sized battle (two corps per side) at Halback. The major battle (four corps per side) of the campaign was fought at Magdeburg.
At the end of the campaign the Prussians held Magdeburg and two other bridge heads over the river Elbe. But they had been forced to withdraw to the west bank. So the Prussians won the campaign. But the French lived to fight another day.
Contents of the Blog
The blogs appear in the order they are typed. To make it easier to follow the campaign I have used the labels on the top right of this page as an index. They are as follows:
02 - Campaign Background. This explains how the Magdeburg campaign fits into the 1813 campaign.
03 - Prussian Army. This contains photographs of the Prussian headquarters, army, and corps. It also contains detailed orders of battle for each corps.
04 - French Army. This contains photographs of the French headquarters, army, and corps. It also contains detailed orders of battle for each corps.
05 - Campaign Movement. This is the day by day orders for the movement of each corps. It also contains a strategic map at the start and finish of the campaign and also for each battle.
06 - Campaign Diary. A day by day account of the progress of the campaign. It also contains a strategic map at the start and finish of the campaign and also for each battle.
07 - Calbe Battle Report. This contains the tactical map, photographs of each stage of the battle and a short description of the battle.
08 - Colbitz Battle Report. This contains the tactical map, photographs of each stage of the battle and a short description of the battle.
09 - Halback Battle Report. This contains the tactical map, photographs of each stage of the battle and a short description of the battle.
10 - Magdeburg Battle Report. This contains the tactical map, photographs of each stage of the battle and a short description of the battle.
If you want to read any of the above blogs, just click on the appropriate label above right.
Prussians complete their withdrawal to the west bank of the river Elbe.
They continue to hold bridgebeads at Magdeburg, Parey and Dessau.
This was a limited victory for the Prussians.
French advance to east bank and halt.
They have clearly failed to achieve their objectives of holding the line of the river Elbe.However they have contained the Prussians at the river line.
It was a defeat, but not a disaster.
15 May
The French rested after their day of victory.
Blucher ordered one corps to hold Magdeburg, and the other three to withdraw over the river Elbe.Only one corps could cross at Magdeburg, the others two withdrew to Colbitz and Calbe.
14 May 1813 - Battle of Magdeburg
14 May - Battle of Magdeburg - see battle report
This was the largest, and most decisive, battle of the campaign. All four corps of both armies took part, and it was very much "A Near Run Thing".
Blucher has two corps available at the start of the battle, with the remaining two corps due to arrive by mid morning. He took up a defensive postion at Magdeburg and waited for the French attack.
Davout planned to hold with his left and centre, whilst attacking with his right. He created a cavalry division by taking two brigades from his holding corps to support his attack. It started well, but was held by an aggressive Prussian counter attack.
The Prussians were slow to take advantage of this, and Davout quickly switched his attack to his left flank, holding with his centre and right. He used two corps for this attack, leaving the remaining two corps to hold the centre and right. This time he was successful drove the Prussian left back over the river Elbe. However he was unable to take Magdeburg.
Both sides suffered heavy casualties, and the Prussians withdrew over the river, but kept a strong bridgehead in Magdeburg. The French withdrew to Brunswick to regroup and reform.
13 May
Bluchers joy at taking Magdeburg was short lived.News soon arrived of a French advance in the north towards Halbeck, and of the retreat of his 4th corps to Colbitz.He still had possession ofall the west bank, and Magdeburg.But what were the French up to?By now they should be in headlong retreat towards Hannover.He ordered his four corps to hold their present positions, and send cavalry forward to determine what the French were up to.
Davout had a busy day.His four corps marched at their best speedand all were in position at Seehausen by nightfall.His cavalry were busy throughout the day keeping the enemy cavalry at bay and preventing them from discovering the exact location of each corps.All was now ready for the critical battle of the campaign – the battle of Magdeburg.
12 May
Blucher ordered 1st and 3rd corps to attack Magdeburg and moved south with 3rd corps to supervise the action.When he arrived he found the city deserted, the French had abandoned the city without a fight.Blucher had achieved all of his campaign objectives.
Davout had not been idle.13th corps were ordered to abandon the city and fall back to Seehausen.4th and 6th corps were ordered to attack the isolated 4th Prussian corps at Halbeck.He led 6th corps north, but the Prussians withdrew to Colbitz at his arrival.At midnightDavout issued orders for aconcentration of all his corps at Seehausen in preparation for an attack on Magdeburg.
11 May
Blucher must now make a decision about how best to exploit his third victory over the French.He could exploit his victory at Halbeck, and push on towards Hannover.However this wouldsplit his army and leave him open to a counter attack further west.Or he could move south to take Magdeburg and complete his stated mission.He decided on the latter course.
Confident that there was nothing more to fear from the French, he ordered 4th corps to hold Halbeck and 3rd corps to retreat to Colbitz.Once rested he would move on Magdeburg.
Davout was aware that he must abandon Magdeburg or risk the loss of 13th corps.He was also aware that if he allowed Blucher to consolidate his position west of the river, he would have to retreat to Hannover.He was determined to make one final effort to destroy the Prussians before they could consolidate.
He ordered 4th corps to retire to Wolfsburg and rest.6th corps would move south to Seehausen to cover 13th corps withdrawal from Magdeburg.5th corps would hold Groningen until this redeployment was complete, and would then move north to Seehausen
10 May 1813 - Battle of Halbeck
10 May – Battle of Halbeck – see battle report
Blucher led the attack on Halbeck.For the battle he created a cavalry reserve by taking the cavalry brigade from each corps.He approached the town with one corps on either side of the Colbitz-Halbeck road, and the cavalry off to the left.He was aware that there was only one French corps holding the town, and his cavalry were pushed forward to delay the approaching reinforcement.
Despite Davout’s best efforts, 6th corps was still in reserve when the battle started.4th corps was in a good defensive position and at daybreak 6th corps moved forward to support them.He ordered them to deploy to the south of the town, but as they approached the Prussian cavalry advanced.4th corps cavalry were outnumbered and routed.6th corps cavalry went forward to cover their retreat, but were also pushed back.Meanwhile 4th corps was outnumbered two to one and forced to abandon Halbeck.
A third defeat for the French, but at least 6th corps were able to cover the retreat and the damage to 4th corps was not too serious.
9 May
Blucher was slow to build up his position at Colbitz.He spent the day redeploying 3rd and 4th corps around the town, and allowed the French to regroup to the west at Halbeck.
Davout did not waste any time at Halbeck.By mid morning 4th corps were in a strong defensive position around the town, and he was busy preparing 6th corps to become operational again.He was determined to be ready for the expected Prussian advance on Halbeck
8 May
Blucher was overjoyed at another victory, and this time in the vital north.3rd corps was allowed to rest in Colbitz, and 4th corps to cross the river to support them.Further south he would hold his position in front of Magdeburg and at Calbe.
At first light Davout arrived in Halbeck to rally his shaken 6th corps. He brought 4th corps into the town and withdrew 6th corps to regroup west of Halbeck. He was aware that if the Prussians were allowed to take Halbeck he would be unable to hold.
7 May 1813 - Battle of Colbitz
7 May – Battle of Colbitz (see battle report)
Blucher was content to hold his two bridge heads north and south of Magdeburg, until he could reinforce the northern one and push forward towards Halbeck.He ordered 1st, 2nd and 3rd corps to hold and 4th corps to move north to Parey.Following their defeat at Calbe, he did not expect any offensive moves from the French.
Again Davout grasped the initiative.With the approach of 4th corps from the north, he wanted to retake Colbitz and secure his northern flank.He ordered 6th corps to retake the town, and 4th corps to move to Halbeck to support them.
The area between Halbeck and Colbitz is hilly and broken, and this aided the Prussian defence.The French advance was broken by the hills, and they delivered their attacks piecemeal down the valleys leading to Colbitz.The Prussians held their ground, and at nightfall the French fell back to Halbeck.It was another serious setback for the French.
6 May
Blucher’s plan of campaign called for an advance north of Magdeburg, to protect his communications with Berlin.Pleased with the victory to the south, he was still determined to stick to his original plan.He ordered 3rd corps, in the north, to cross the river and occupy Colbitz, 4th corps was ordered to move north to support them.
Davout was concerned at the loss of Calbe.The Prussians were now established on the west bank of the river.However he still held Magdeburg, 6th corps was immediately available and 4th corps approaching from the north.When he received reports of Prussian cavalry crossing the river to the north, at Colbitz,He ordered 6th corps to move north to Halbeck.5th corps would regroup at Groningen and hold the southern flank.
5 May 1813 - Battle of Calbe
5 May – Battle of Calbe (see battle report)
Both sides consolidated their positions whilst waiting for the outcome of the battle.The Prussians attacked with great determination and drove the French out of Calbe.Under cover of darkness the French retreated towards Groningen.They would require at least two days to recover from their defeat.
4 May
Blucher’s main army arrived at the river Elbe.As night fell 1st corps arrived in sight of Magdeburg.3rd corps, to the north, approached the river at Parey.4th corps was held in reserve at Drewitz.But the most important news was from 2nd corps to the south.They had reached Dessau and fought a cavalry skirmish for possession of the town.The French were in position at Calbe.Blucher sent orders for 2nd corps to attack and seize Calbe.
For most of the day Davout had held Magdeburg with only the cavalry of 13th corps.Just as Prussian cavalry were approaching Mockern the remainder of 13th corps began to arrive.The city was secure.
Good news also from 6th corps, who had arrived at Seehausen just one days march to the east.Not so good from 4th corps, who were still 4 days march to the north.Most important of all, 5th corps had reached Calbe ahead of the Prussians.They reported a cavalry skirmish, and were taking defensive positions around the town.
3 May
The cavalry of 2nd Prussian corps reached the Elbe at Goswig, south of Magdeburg , and found the bridge intact and undefended.Blucher ordered them to cross and push on towards Dessau.His other three corps continued their race for the river.
Davout arrived in Magdeburg at midnight.Reports were coming in of large bodies of Prussians approaching from the east, and of a crossing far to the south at Goswig.13th corps was approaching Magdeburg, but the other two corps were still 2 and 5 days march away.True to form he grasped the initiative and ordered 5th corps to march south to Calbe and 13th corps to replace them in Magdeburg.This would leave the city at risk for a few hours, but there were no reports of any Prussian troops within one days march of the city.He sent orders to 4th corps to abandon their careful march down the river and make straight for Magdeburg.
2 May
It was now a race to the Elbe, and the Prussians were winning.Blucher moved his headquarters to Potsdam, where he received reports from his cavalry that there was no sign of any French activity east of the river.
Leaving 6th corps to make its long journey to Magdeburg, Davout rode ahead to Brunswick and send orders to 5th corps to hold Magdeburg at all costs.
1 May 1813 - Start of Campaign
1 May – Start of Magdeburg Campaign
Prussia declares war on France and Prince Blucher is ordered to march on the river Elbe and capture Magdeburg.He immediately orders his four corps to march west, sending his cavalry ahead to recce crossing of the river north and south of Magdeburg.
180 miles to the west, at his headquarters in Hannover, Marshal Davout is well aware of the threat posed by the Prussian army.Only two of his four corps are immediately available for action, and are positioned on the river Elbe.The 4th corps is at Hamburg and the 5th corps at Magdeburg.Between them they had 80 miles of river to defend.The 13th corps was regrouping at Brunswick.They had suffered badly in Russia the previous year, but were not ready to take the field again.The newly formed 6th corps was under his personal command at Hannover, and was also ready to take the field.
As soon as he received notification of the Prussian declaration of war Davout ordered 6th and 13th corps to march to Magdeburg.4th corps was ordered to move south along the west bank of the river Elbe, but to keep watch for any Prussian move on Hamburg.
The Prussians have achieved their campaign objective of crossing the river Elbe and capturing Magdeburg. They have defeated the French three times in the process. However they are widely spread out along the west bank of the river.
The French have withdrawn from Magdeburg to entice the Prussians to cross the river. They have now concentrated and hope to drive them back over the river.
WARGAME
The wargames table will consist of squares G4, G5, G6, H4, H5, H6, I4, I5, I6.
The game objective is Magdeburg (group of buildings in centre)
1st and 3rd Prussian corps (Jan) are in and around Magdeburg
2ndPrussian corps (Jan) will enter on bottom road on move 4
4th Prussian corps (Jan) will enter on top road on move 4
4th, 5th 6th French corps, and 13th Polish corps, (Paul) will all enter from left
BATTLE REPORT
The French plan of attack was to hold on the left with 13th Polish corps, advance on the centre towards Magdeburg with 5th and 6th French corps but halt to await developments.4th corps would be the main attack would be on the right.It would be supported by acavalry division created by taking two brigades and horse artillery from the other corps.
Blucher would hold Magdeburg with 1st corps, and the area to his right with 3rd corps until his reinforcements arrived.
The French left are approaching the farm, where they have orders to halt.To their right the centre is approaching Magdeburg.
The French right are advancing towards the open Prussian left.Prussian cavalry have been sent to spot the French, and they have sent their cavalry forward to keep them at bay.
The Prussian cavalry charge before the full French cavalry division can deploy.They win the melee, and rout the cuirassiers.The second French cavalry brigade has to check its morale, fails and also routs, taking the horse artillery with them.The Prussian cavalry are still a threat, and the right flank commander orders a halt and infantry into square.
Within minutes the whole French attack has stalled.
The French are slow to take advantage of this set back.They bring up their own cavalry reserve,which results in the French centre halting and forming square, as their corps cavalry had been withdrawn to form the cavalry division.
Davout ordered his centre and right to hold their ground.He then rode to the left flank and ordered 5th and 13th corps to advance against the Prussian right.The main French attack would now be on the left.
The Frenchattack broke the 3rd Prussian corps, who routed back into the 4th corps, who were just arriving in column of march.Blucher was busy on the opposite flank, trying to organise his own attack.By the time he arrived both corps were badly shaken, with a number of brigades in rout.
Having ordered his left to engage the Prussians right of Magdeburg, Davout returns to 5th corps to order them forward to engage Magdeburg.On the far right 6th corps will hold at all costs.
The Prussian right, 3rd and 4th corps, are broken and in rout.5th French and 13th Polish are in hot pursuit.They have reached theroad junction and are about to move past Magdeburg (left out of photograph)
Conclusion
After an initial setback, which might have lost the battle for a lesser general, Davout managed to organise his left wing to smash the Prussians before they could deploy.However he is well aware that his tired corps, who have suffered three recent defeats and marched for two days to concentrate for this battle, are in no condition tomount an effective pursuit.
Blucher has spent two days at Colbitz building up his forces west of the Elbe. He now orders 2nd and 4th corps to attack Halbeck and open the road to Hannover.
Having lost at both Calbe and Colbitz, the French situation is now critical. Davouthas placed 4th corps in Halbeck, and regrouped 6th corps behind the town.
WARGAME
The table consists of squares D1, D2, D3, E1, E2, E3, F1, F2, F3
The village of Halbeck is the objective
4th French (Jan) in position at Halback.
6th French (Jan) will approach from left
3rd and 4th Prussian (Paul) will approach from right
BATTLE REPORT
The Prussian army approached Halbeck with 3rd corps on the left and 4th corps on the right A cavalry division has been created by taking the brigades from each corps. The cavalry division swing to the left, to threaten the French right flank and delay their reinforcements. The Prussian cavalry to advance to silence the enemy guns, the French infantry form square, and their cuirassiers move forward in support. Unable to approach the guns, the hussars charge the enemy cavalry.
6th French corps send their cavalry forward to join the cavalry melee, and form square with their infantry until the cavalry duel is decided.
The Prussian cavalry have beaten the cuirassiers who withdraw, however 6th corps cavalry charge to cover the withdrawal.. The Prussians again win the melee, but are left disordered and require time to regroup.
The infantry of 3rd corps continue to soak up the French artillery fire, but remain firm. The combined Prussian artillery have failed to make much impression. Unless they can master the enemy gunners, 3 corps will have to withdraw before the increasing casualties break their morale. 6th French corps remain in square, as the beaten cavalry flow past them.
The concentrated Prussian artillery fire finally has its effect, the enemy gunners are shaken, fail their morale and flee. The nearby square also fails its morale and joins them. Unfortunately the Prussian cavalry are still disorganized and unable to take advantage of this opportunity.
3rd corps is ordered to advance and pursue fleeing enemy. They detach their landwehr brigade to engage the enemy garrison in Halbeck.
4th corps to engage the enemy infantry on the right, with their two best brigades, whilst the remaining two storm the town. Although there is no artillery support, the Prussian infantry win the day. After a brisk musket fight the supporting French infantry break and run. The garrison of the town puts up a determined defence, and defeat the first brigade. However the two remaining brigades finally overrun them and they withdraw from the town in good order.
The French 4th corps is broken and in rout. However 6th corps, apart from their cavalry, are intact and relatively safe in their squares. They withdraw in good order, covering the rout and holding the weary Prussian cavalry and infantry at bay.
Conclusion
The battle has been a clear, but not decisive, victory for the Prussians.
The French will retreat and will take one day to recover.
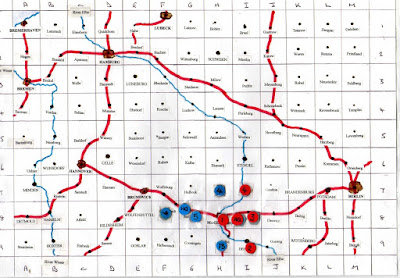
 Strategic Map for the Magdeburg Campaign


